Whether you’re a Bluebeam beginner or a seasoned expert, we all have gaps in our knowledge. Tuesday Tidbits will help you fill in those gaps. Every Tuesday, I’ll teach you simple techniques that you can learn in under 10 minutes and implement immediately to improve your workflow.
Highlighting is an essential feature of marking up drawings. Unfortunately, it can sometimes be a little frustrating in Bluebeam… that is, until you read this post. Let’s get right into it.
Today we’ll go over 5 different methods to highlight text and objects within Bluebeam:
EDIT 2/2/2023: Don’t feel like reading? Watch the video here!
Some items to note:
![]()
The first, and most obvious, way to highlight stuff is the Highlight tool ![]() . In the default Bluebeam interface, it can be found in the upper righthand corner underneath the Textbox tool
. In the default Bluebeam interface, it can be found in the upper righthand corner underneath the Textbox tool  . There are two different ways to use the Highlight tool
 ![]() , either by selecting text directly or using it in freeform mode which is similar to the Pen tool
, either by selecting text directly or using it in freeform mode which is similar to the Pen tool  .
.
Select text is the default mode of the Highlight tool ![]() . If the Highlight tool
. If the Highlight tool ![]() detects the presence of text, the cursor will change to look like this
detects the presence of text, the cursor will change to look like this ![]() or if no text is detected it will look like this
or if no text is detected it will look like this ![]() .
.
When the Highlight tool ![]() is selected and the cursor looks like
is selected and the cursor looks like ![]() , you can highlight text by clicking and dragging, similar to what you would do in Microsoft Word. The resulting markup it attached to the selected text and cannot be moved or resized.
, you can highlight text by clicking and dragging, similar to what you would do in Microsoft Word. The resulting markup it attached to the selected text and cannot be moved or resized.
There’s an issue that can arise when using this method on drawings, however. When text is spread throughout the page or when text has unusual orientation, selecting text can be tricky. You’ll often highlight things you didn’t intend to. You only need to experience this a couple times to know exactly what I’m talking about. It can be really frustrating. Luckily, the remaining 4 methods do not suffer from this issue.
Freeform highlight using the Highlight tool ![]() is similar to the Pen tool . Simply hold down the CTRL key while using the Highlight tool
is similar to the Pen tool . Simply hold down the CTRL key while using the Highlight tool ![]() and you can freeform highlight whatever you like. The resulting markup can be resized and rotated.
and you can freeform highlight whatever you like. The resulting markup can be resized and rotated.
You can also use this method to highlight in perfectly straight horizontal or vertical lines by holding the CTRL+SHIFT keys at the same time.
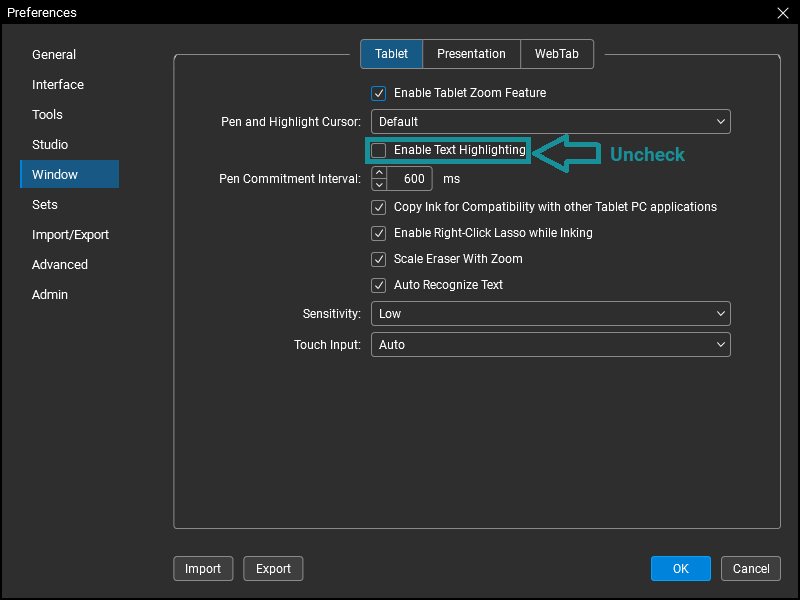
As described above, you can set this as the default mode in the Preferences menu.
By default, the Select Text ![]() tool is found at the bottom of the window to the left of the page number, or with the keyboard shortcut Shift+T. If text is detected, the cursor will look like this
tool is found at the bottom of the window to the left of the page number, or with the keyboard shortcut Shift+T. If text is detected, the cursor will look like this ![]() . If text is not detected, the cursor will look like this
. If text is not detected, the cursor will look like this ![]() .
.
![]()
Similar to the Highlight tool , you can force a “freeform” text selection by holding CTRL and click dragging a rectangle around the text you’d like to highlight. Then right-click on the selected text and click Highlight Selected Text.

Similar to the Highlight Text – Select Text method, the resulting markup is attached to the text and cannot be moved or resized.
Did you know you can highlight search results within Bluebeam? In particular, I use this method when I’m checking joist shop drawings or when I’m having a hard time finding the text I searched for on a crowded drawing.
In your search results list, select the results you’d like to highlight, right-click, and select Highlight.
Similar to the Highlight Text – Select Text and Select Text Tool methods, the resulting markup is attached to the text and cannot be moved or resized.
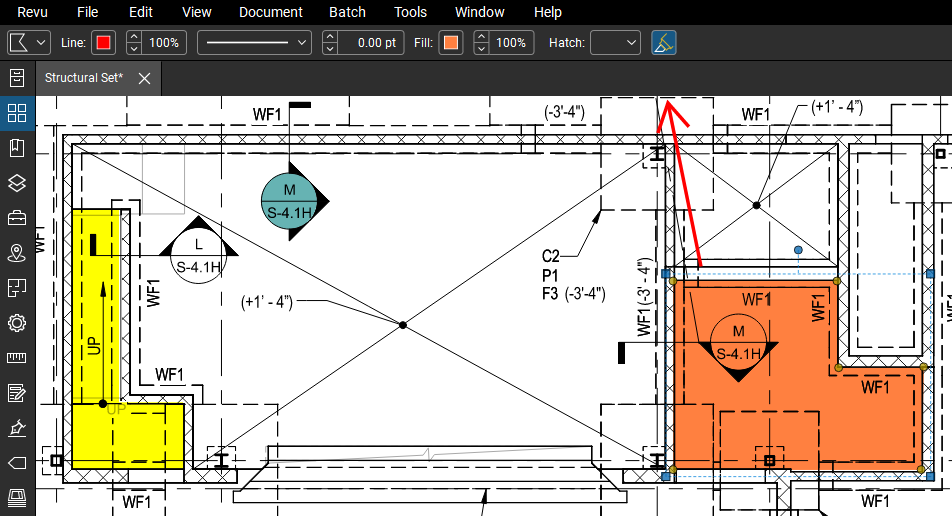
You can also highlight using any of the following markups:
• Line 
• Arrow ![]()
• Arch 
• Polyline 
• Rectangle 
• Ellipse 
• Polygon
Draw the desired shape, select the markup, choose a fill color if using an enclosed shape ( 
 ) and toggle the Highlight
 ![]() option in the markup properties.
option in the markup properties.
So what do you think? Did I miss anything? Did you learn something new? Let me know in the comments!